
The composer is made to help you create and edit songs, it allows you to use multiple instruments, each of them with different pitches, reverb, volume etc...
It is a simple music DAW with which you can even create rather complex songs (there will be some examples after)
The images below are from the genshin version of the app, but the functionality is the same
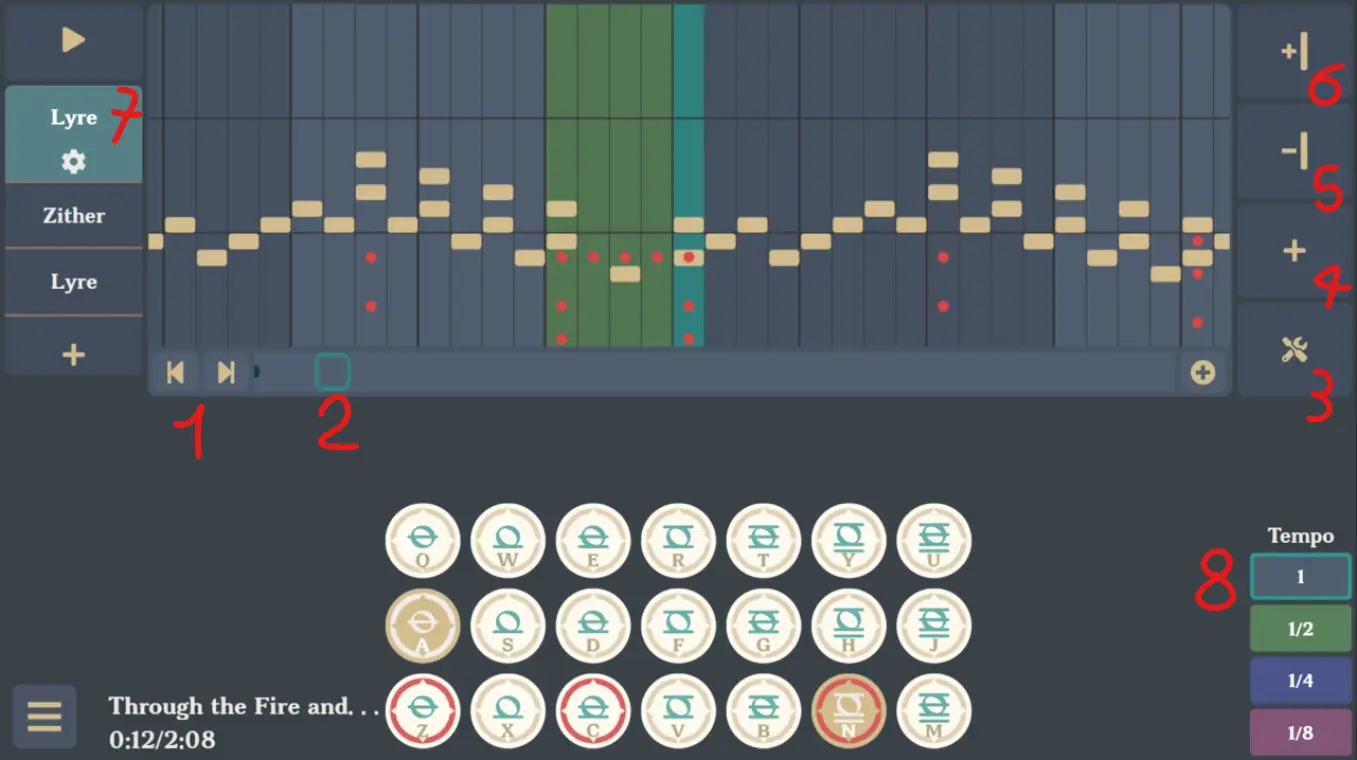
- Go to the next / previous breakpoint, a breakpoint can be added from the button in the timeline, it's a marker that you will be able to "jump" to
- This is a "timeline" where all breakpoints will be shown, the window inside of it shows you how the piece of the song which is currently visible in the composer canvas. You can drag this window to quickly move inside the song
- Opens the tools, there will be more information about them in this post
- Adds 16 columns at the end of the song, a column is the unit of time where you can place notes
- Remove the current selected column
- Adds a column after the current one
- Layer selection, here you can select your current layer, and create/remove other ones. Each layer can have a different instrument, pitch, reverb, volume, etc...
To make it easier to distinguish between layers, each of them has a different icon inside the canvas, so you can identify more easily which note is part of what layer - Those are the "tempo changers", they are meant to change the tempo of a single column. The number (1/2, 1/4, etc...) tells you how much that column is gonna last compared to the song's BPM. You can use it to have little "bursts" of quick notes, or also to make a whole section go faster. If you see yourself using a lot of them, it might be better to increase (double) the BPM of your song
Composer Tools
The composer has useful tools that you can use to make it easier to edit/compose a song.
A very useful tool is the MIDI conversion, which transposes a MIDI song into a format that can be used in the app. For more info on how to use it, go to the Midi conversion guide. Also similar is a video/audio transposer, find more info in the Audio conversion guide.
This next tools are the ones available by clicking the "tools" button on the right of the composer
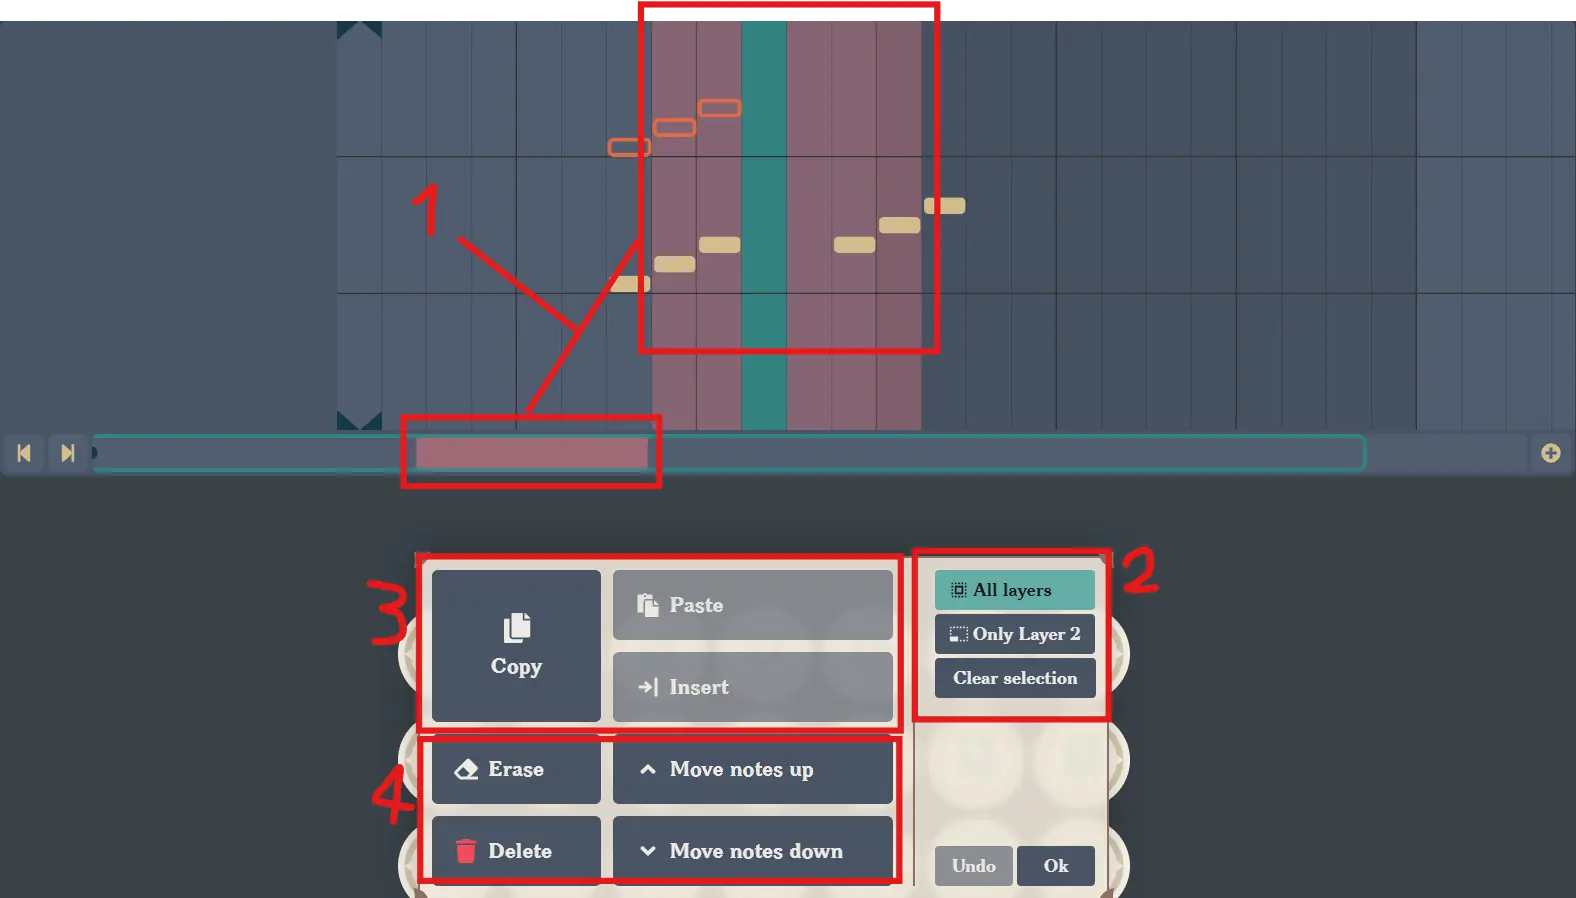
- This is the currently selected columns, the initial operations like copy/erase/delete will be applied to them. You can select more columns by moving the canvas to the left/right, if you want to clear the selection, press the "clear selection" button on the right. This mode is called the "selection" mode.
- With this you can decide to which layers to apply those tools, you can either select to make it apply to all layers, or only to the currently selected layer.
- The tools you view translucent are disabled untill you "copy" the notes in the columns with the copy button. Once you press the Copy button, the selection will be cleared and you will enter the "insert" mode, the next image will show you more info for it.
- The "erase" button will erase all the notes that are currently selected, if you selected all layers, it will clear the contents of the whole columns, while if you selected only one layer, it will clear the notes of that layer.
The "move notes up/down" button will move the notes you selected one position up or down, be careful when a note is on the edges of the canvas, if they go "beyond" it, they will be deleted. You can always press "undo" to go back to the last edit
the "delete" button is only available when all alyers are selected, it will delete all the selected columns. - When you are in the selection mode, you can also press the tempo changers to set the tempo changer of that whole selection.
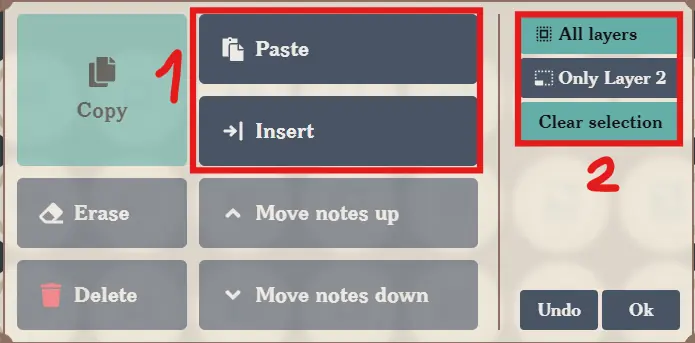
Once having copied the notes you want, you will be inside the "insert" mode.
- Inserting will put the notes from the currently selected column, without creating new columns
Pasting will create new columns (as many as needed) and paste inside of it, the notes you copied before. - If you want to clear the current selection and select more notes, you can press the "clear selection" button, this will also make you exit the insert mode.

Those are the settings of the composer, you can open it by pressing the settings button in the side menu
Bpm
: This setting will set the Beats Per Minute of the whole song, one column will last for as long as (60000ms / bpm), for example with a bpm of 200, one column will last for (60000ms / 200) = 300ms.- Base pitch: This is the default pitch of all instruments, you can override the pitch of a single instrument inside the settings of the instrument.
- Beat marks: This will cut the canvas into 3 or 4 "sections" of 4 columns, you can use those to help yourself with the tempo of the song.
- Note name type: The name that the notes in the keyboard of the composer will use.
- Number of visible columns: The number of columns that will be visible at a time in the canvas. Warning, a high value might cause lags, if you have lag issues, try to reduce this value.
- Base reverb: This will enable reverb by default for all instruments in the song, you can override this in the instrument.
- Autosave changes: It will auto save the changes you applied to a song every 5 edits.
- Put next/previous column buttons around keyboard: This adds two buttons on the left and right of the keyboard that selects the previous and next columns.
- Autoplay in all tabs: This is a feature that will start/stop playing all your browser tabs that have the composer open.
- Lookahead time: To prevent lags from the app affecting audio, notes are "scheduled" to be played a few milliseconds before than they are actually played, this value will give the app a certain amount of time where lags in the app won't affect the audio timing accuracy. This will cause the audio to "lag behind" the canvas, you can reduce or disable this lookahead. If your audio stutters, try to increase this value.
- Connect MIDI keyboard: You can use a MIDI keyboard to make it easier to compose a song, by using the keyboard to select/deselect notes.
If you want to know how to connect your MIDI keyboard, follow the connect MIDI device guide.
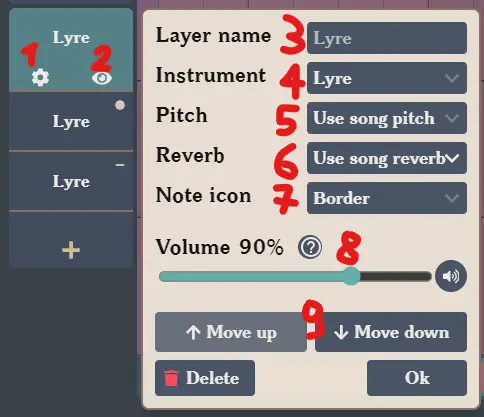
This is the layer settings, on the left there is the layer selection, the highlighted one is the currently selected layer, to create a new layer, press the "+" button. The icon on the top right is the same icon used inside the canvas for that instrument, you can have as many as 52 layers
- Opens the settings menu of this layer.
- Toggles the visibility of this layer inside the canvas. If the layer is hidden, when it is deselected, the notes of this layer won't be visible inside the canvas.
- This is the name of the layer which you will be able to see in the layer selection, if left empty, it will show the instrument name.
- This is the instrument of this layer.
- This is the pitch of this instrument, leave it as "Use song pitch" to use whichever pitch the song is using.
- This is the reverb selection, it will set the instrument to have or not the reverb, leave it to "Use song reverb" to use the value of the song is using.
- This lets you choose which icon you want to see inside the canvas for this instrument. As there are only a few icons, those will have to be repeated in case you have many instruments.
- This will let you choose the volume for this instrument, a higher value might cause distortions in the audio. If you hear distortions, try to lower the volume of the instrument. You can also press the "mute" button to mute this instrument.
- This will move the layer one position up or down, just used to organise layers.
Composer shortcuts
The composer has some shortcuts you can use, if you want to change them, go to the keybinds page
Space | Toggle play / pause |
KeyA | Select the previous column (Holdable) |
KeyD | Select the next column (Holdable) |
KeyQ | Remove the selected column (Holdable) |
KeyE | Add a column after the selected column (Holdable) |
ArrowUp | Select the previous layer (Holdable) |
ArrowDown | Select the next layer (Holdable) |
ArrowRight | Move to the next breakpoint (Holdable) |
ArrowLeft | Move to the previous breakpoint (Holdable) |